Jar上传到Maven仓库
前言
Github:https://github.com/HealerJean
GitHub的强大,详细很多小伙伴们都知道了,下面我主要讲解的是两种jar包的上传,
1、第一种是我们自己写的代码想提供给他人或者自己使用
2、第二种是针对一些平台,比如阿里,百度等知名互联网他们提供的jar包制作成我们的maven包
1、GitHub生成自己的Maven私服
1.1、本地操作
1.1.1、配置发布管理器
将这个发布管理器发布的maven版本放到我们本地(发布管理器如果不懂的话,建议查找我的博客进行了解)
下面这个名字,建议根据我们所制作的maven的jar包的作用进行命名,因为为了我们已经自己在github上查看方便以及维护方便
<distributie.directory>maven_directory</distributie.directory>


<distributionManagement>
    <repository>
        <id>healerjean-managemaent_id</id>
        <name>healerjean_managemaent_name</name>
        <url>file://${project.build.directory}/${distributie.directory}</url>
    </repository>
</distributionManagement>
1.1.2、添加maven发布插件
<!--maven发布插件-->
<plugin>
    <artifactId>maven-deploy-plugin</artifactId>
    <version>2.8.1</version>
    <configuration>
        <altDeploymentRepository>internal.repo::default::file://${project.build.directory}/${distributie.directory}</altDeploymentRepository>
    </configuration>
</plugin>
1.1.3、完整的pom如下
<?xml version="1.0" encoding="UTF-8"?>
<project xmlns="http://maven.apache.org/POM/4.0.0" xmlns:xsi="http://www.w3.org/2001/XMLSchema-instance"
	xsi:schemaLocation="http://maven.apache.org/POM/4.0.0 http://maven.apache.org/xsd/maven-4.0.0.xsd">
	<modelVersion>4.0.0</modelVersion>

	<groupId>com.healerjean.proj</groupId>
	<artifactId>hlj-github-maven</artifactId>
	<version>1.0.1</version>
	<packaging>jar</packaging>

	<name>hlj-github-maven</name>
	<description>hlj-github-maven</description>

	<parent>
		<groupId>org.springframework.boot</groupId>
		<artifactId>spring-boot-starter-parent</artifactId>
		<version>2.0.4.RELEASE</version>
		<relativePath/> <!-- lookup parent from repository -->
	</parent>

	<properties>
		<project.build.sourceEncoding>UTF-8</project.build.sourceEncoding>
		<project.reporting.outputEncoding>UTF-8</project.reporting.outputEncoding>
		<java.version>1.8</java.version>
		<distributie.directory>maven_directory</distributie.directory>

	</properties>

	<distributionManagement>
		<repository>
			<id>healerjean-managemaent_id</id>
			<name>healerjean_managemaent_name</name>
			<url>file://${project.build.directory}/${distributie.directory}</url>
		</repository>
	</distributionManagement>


	<dependencies>
		<dependency>
			<groupId>org.springframework.boot</groupId>
			<artifactId>spring-boot-starter</artifactId>
		</dependency>

		<dependency>
			<groupId>org.springframework.boot</groupId>
			<artifactId>spring-boot-starter-test</artifactId>
			<scope>test</scope>
		</dependency>


	</dependencies>

	<build>
		<plugins>
			<plugin>
				<groupId>org.springframework.boot</groupId>
				<artifactId>spring-boot-maven-plugin</artifactId>
			</plugin>

			<!--maven发布插件-->
			<plugin>
				<artifactId>maven-deploy-plugin</artifactId>
				<version>2.8.1</version>
				<configuration>
					<altDeploymentRepository>internal.repo::default::file://${project.build.directory}/${distributie.directory}</altDeploymentRepository>
				</configuration>
			</plugin>
		</plugins>
	</build>

</project>
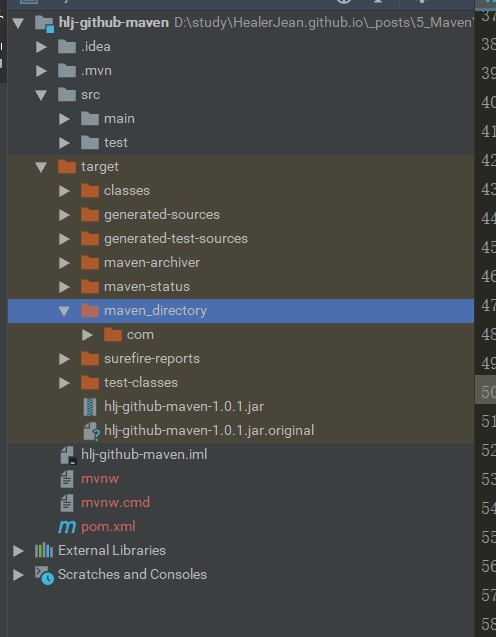
1.1.4、运行命令发布
,发布到我们上面配置的路径target/maven_directory中
mvn clean deploy

1.2、GitHub操作
1.2.1、创建仓库
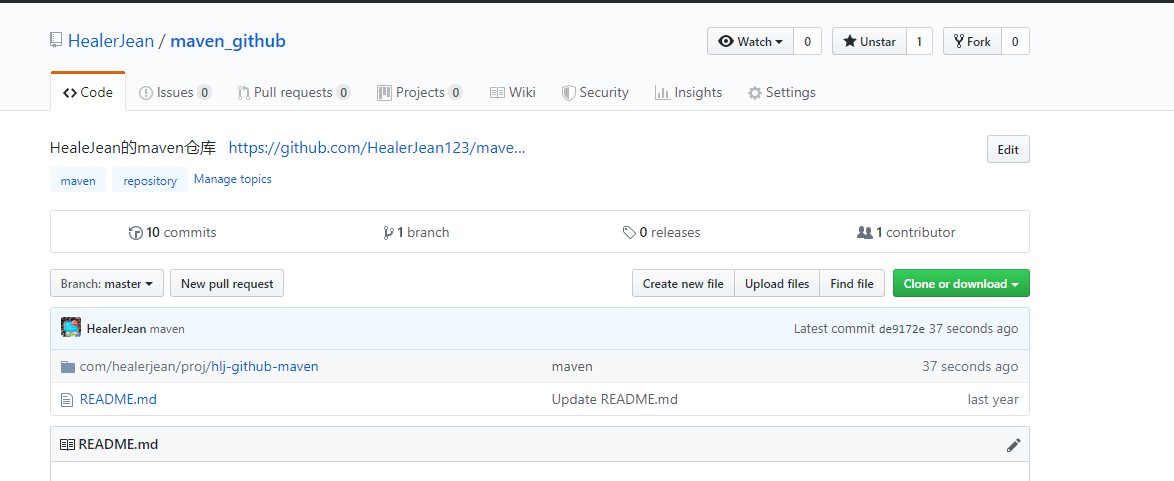
创建一个maven项目
maven_github,将maven_directory里面的所有文件复制到我们创建好的maven项目中去

1.3、导入远程仓库
准备工作:pom中开始使用这个pom依赖,为了测试,我们应该先删除除掉本地仓库中的依赖包,并新建一个项目
1.3.1、仓库配置
开始导入我们自己的依赖,这个是及时我们更新pom,发现还是显示红色报错,不过没关系,我们直接使用命令 mvn package,强制下载
<repositories>
    <repository>
        <!--id任意-->
        <id>healerjean-repo</id>
        <url>https://raw.github.com/HealerJean/maven_github/master/hlj-test-github-maven</url>
    </repository>
</repositories>


<!--github仓库导入的-->
<dependency>
    <groupId>com.healerjean.repo</groupId>
    <artifactId>hlj-github-maven</artifactId>
    <version>1.0.1</version>
</dependency>
mvn packege

2、Jar上传到Github制作依赖包
参考下面的,将它先导入本地maven仓库,然后我们直接将生成的文件夹
taobao-sdk-java上传到上面那个仓库中
mvn install:install-file -Dfile=taobao-sdk-java-5.2.1.jar -DgroupId=com.healerjean.proj -DartifactId=taobao-api-20191021 -Dversion=1.0.1 -Dpackaging=jar


mvn install:install-file
-Dfile=taobao-sdk-java-5.2.1.jar
-DgroupId=com.healerjean.proj
-DartifactId=taobao-api-20191021
-Dversion=1.0.1
-Dpackaging=jar
<dependency>
    <groupId>com.healerjean.proj</groupId>
    <artifactId>taobao-api-20191021</artifactId>
    <version>1.0.1</version>
</dependency>

3、Jar上传到私服
3.1、确定私服地址
  <distributionManagement>
        <repository>
            <id>central</id>
            <name>maven-release-virtual</name>
            <url>https://${artifactory.url}/artifactory/maven-release-virtual</url>
        </repository>
        <snapshotRepository>
            <id>snapshots</id>
            <name>maven-snapshot-virtual</name>
            <url>https://${artifactory.url}/artifactory/maven-snapshot-virtual</url>
        </snapshotRepository>
    </distributionManagement>
3.2、命令上传
mvn deploy:deploy-file -Dfile=scf-pdf-1.0.0-SNAPSHOT.jar -DgroupId=com.fintech -DartifactId=scf-pdf -Dversion=1.0.0-SNAPSHOT -Dpackaging=jar -Durl=http://nexus.healerjean..net/nexus/content/repositories/snapshots/ -DrepositoryId=snapshots


mvn deploy:deploy-file
-Dfile=scf-pdf-1.0.0-SNAPSHOT.jar
-DgroupId=com.fintech
-DartifactId=scf-pdf
-Dversion=1.0.0-SNAPSHOT
-Dpackaging=jar
-Durl=http://nexus.healerjean..net/nexus/content/repositories/snapshots/ -DrepositoryId=snapshots
4、Jar包class通过build生成新的Jar
4.1、项目依赖
<?xml version="1.0" encoding="UTF-8"?>
<project xmlns="http://maven.apache.org/POM/4.0.0"
         xmlns:xsi="http://www.w3.org/2001/XMLSchema-instance"
         xsi:schemaLocation="http://maven.apache.org/POM/4.0.0 http://maven.apache.org/xsd/maven-4.0.0.xsd">
    <modelVersion>4.0.0</modelVersion>

    <groupId>com.healerjean</groupId>
    <artifactId>test</artifactId>
    <version>1.0-SNAPSHOT</version>
    <packaging>jar</packaging>

    <properties>
        <artifactory.url>pkgs.d.xiaomi.net</artifactory.url>
        <project.build.sourceEncoding>UTF-8</project.build.sourceEncoding>
        <surefire-junit47.version>2.16</surefire-junit47.version>
        <java.version>1.8</java.version>
    </properties>

    <dependencies>

        <dependency>
            <groupId>com.alibaba</groupId>
            <artifactId>fastjson</artifactId>
            <version>1.2.70</version>
        </dependency>


        <!-- 在这里添加你的依赖 -->
        <dependency>
            <groupId>com.healerjean</groupId>
            <artifactId>test-local</artifactId>
            <version>0.0.1-SNAPSHOT</version>
            <scope>system</scope> <!--作用域-->
            <systemPath>${basedir}\lib\test-0.0.1.jar</systemPath> <!--项目根目录下的lib文件夹下-->
        </dependency>

    </dependencies>


</project>
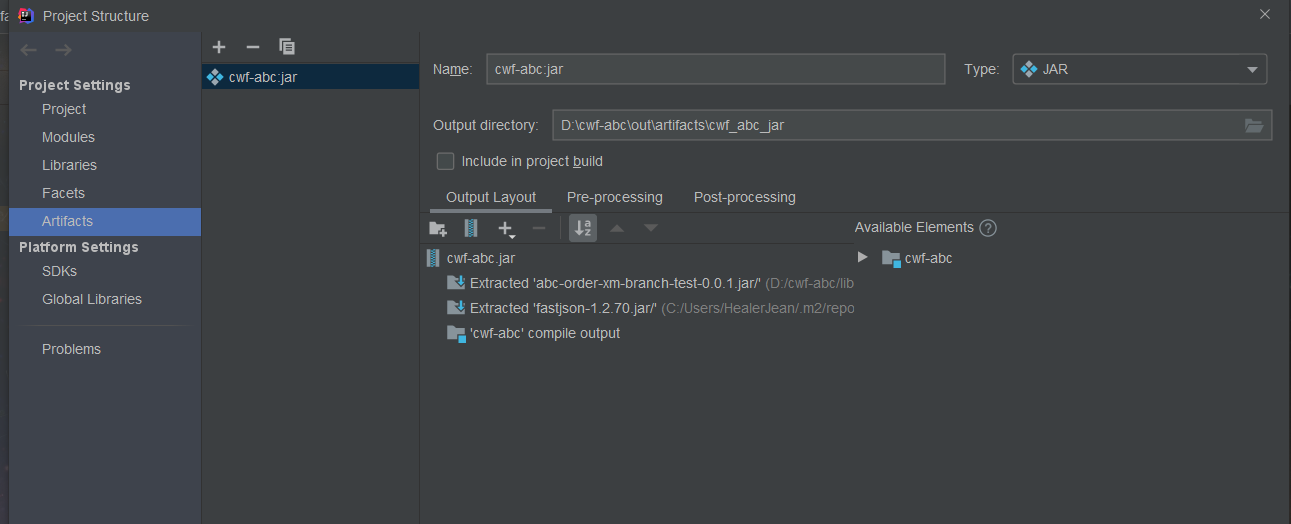
4.2、确定项目

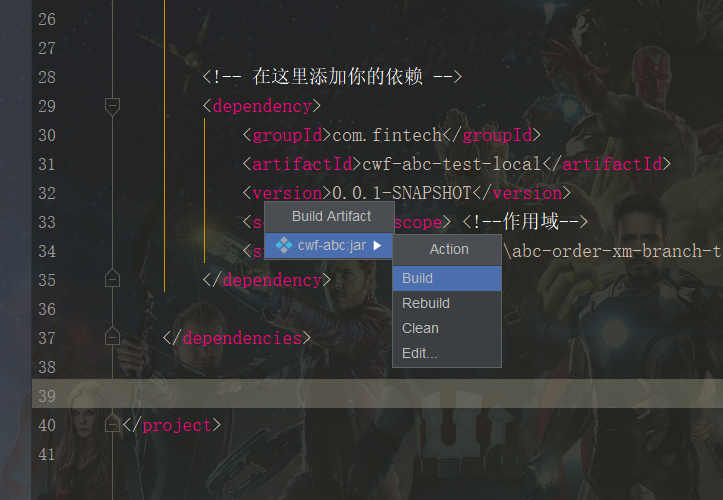
4.3、build

4.4、Jar上传到私服
和3中一样
5、规范
5.1、maven-metadata.xml
<?xml version="1.0" encoding="UTF-8"?>
<metadata>
  <groupId>com.healerjean.proj</groupId>
  <artifactId>hlj-github-maven</artifactId>
  <versioning>
    <release>1.0.1</release>
    <versions>
      <version>1.0.1</version>
    </versions>
    <lastUpdated>20191021083140</lastUpdated>
  </versioning>
</metadata>
5.2、我自己今后的规范
1、groupId com.healerjean.proj
2、artifactId 工具类名字
3、版本 1.0.0(初始)
<dependency>
	<groupId>com.healerjean.proj</groupId>
	<artifactId>hlj-access-</artifactId>
	<version>1.0.0</version>
</dependency>
4、目录发布管理器或者叫githut入口名字 hlj-artifactId
<distributie.directory>maven_directory</distributie.directory>

<distributionManagement>
    <repository>
        <id>hlj-repo</id>
        <name>hlj-reponame</name>
        <url>file://${project.build.directory}/${distributie.directory}</url>
    </repository>
</distributionManagement>

<repositories>
    <repository>
        <!--id任意-->
        <id>hlj-repo</id>
        <url>https://raw.github.com/HealerJean123/maven_github/master</url>
    </repository>
</repositories>

<!--github仓库导入的-->
<dependency>
    <groupId>com.healerjean.repo</groupId>
    <artifactId>test-github-maven</artifactId>
    <version>0.0.1</version>
</dependency>


