Mac基本配置
前言
Github:https://github.com/HealerJean
一、环境变量
1、MAC 路径别名
- 编辑
/etc/synthetic.conf- 该文件必须使用 制表符(Tab) 分隔别名和目标路径。
- 路径必须是 绝对路径。
- 必须先创建好目录
sudo vi /etc/synthetic.conf


## 内容如下
data	/Users/zkq/log
- 重启电脑:重启后,系统会在根目录
/下自动创建一个名为data的符号链接:
┌─[zhangyujin1@ZBMac-J7H7T2943L] - [~] - [643]
└─[$] cat /etc/synthetic.conf                                        [14:17:2
export	/Users/zkq/log
┌─[zhangyujin1@ZBMac-J7H7T2943L] - [~] - [644]
└─[$] cd export                                                      [14:23:53]
┌─[zhangyujin1@ZBMac-J7H7T2943L] - [~/export] - [645]
└─[$] ll /export                                                     [14:24:01]
lrwxr-xr-x  1 root  wheel    50B 11 21 09:23 /export -> /Users/zkq/log
二、终端设置
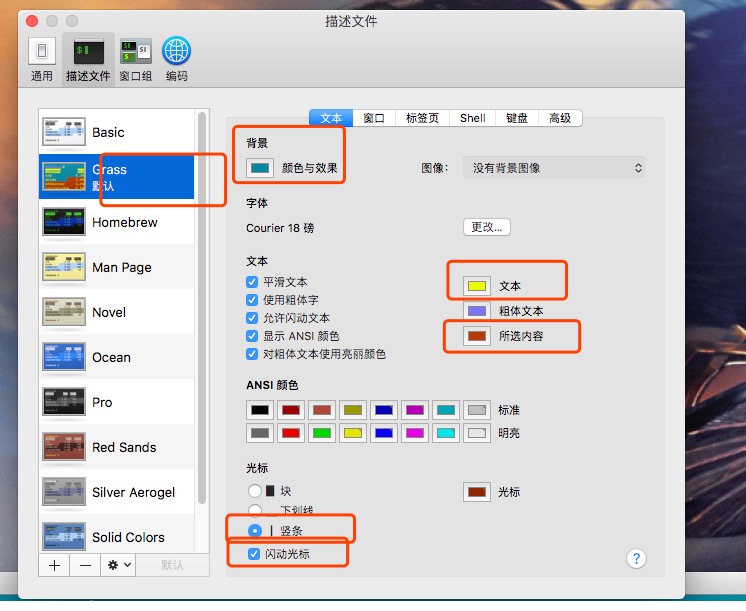
1、设置终端背景颜色和字体大小
2、终端中命令的颜色匹配
vim ~/.bash_profile


#set color
export CLICOLOR=1
export LSCOLORS=gxfxaxdxcxegedabagacad

3、设置漂亮的主题
1)安装oh-my-zsh
sh -c "$(curl -fsSL https://raw.githubusercontent.com/ohmyzsh/ohmyzsh/master/tools/install.sh)"
2)选择一个主题
进入主题的路径,可以选择一个喜欢的主题
cd ~/.oh-my-zsh/themes
配置主题
┌─[healerjean@MAC] - [~/.oh-my-zsh/themes]
└─[$] vim ~/.zshrc                                                   [15:19:29]
我选择的主题是 ZSH_THEME="duellj"
┌─[healerjean@MAC] - [~/.oh-my-zsh/themes]
└─[$] cat ~/.zshrc                                                   [15:22:32]
# If you come from bash you might have to change your $PATH.
# export PATH=$HOME/bin:/usr/local/bin:$PATH

# Path to your oh-my-zsh installation.
export ZSH="/Users/healerjean/.oh-my-zsh"

# Set name of the theme to load --- if set to "random", it will
# load a random theme each time oh-my-zsh is loaded, in which case,
# to know which specific one was loaded, run: echo $RANDOM_THEME
# See https://github.com/ohmyzsh/ohmyzsh/wiki/Themes
#ZSH_THEME="robbyrussell"
#ZSH_THEME="random"
ZSH_THEME="duellj"


# Set list of themes to pick from when loading at random
# Setting this variable when ZSH_THEME=random will cause zsh to load
# a theme from this variable instead of looking in $ZSH/themes/
# If set to an empty array, this variable will have no effect.
# ZSH_THEME_RANDOM_CANDIDATES=( "robbyrussell" "agnoster" )

# Uncomment the following line to use case-sensitive completion.
# CASE_SENSITIVE="true"

# Uncomment the following line to use hyphen-insensitive completion.
# Case-sensitive completion must be off. _ and - will be interchangeable.
# HYPHEN_INSENSITIVE="true"

# Uncomment the following line to disable bi-weekly auto-update checks.
# DISABLE_AUTO_UPDATE="true"

# Uncomment the following line to automatically update without prompting.
# DISABLE_UPDATE_PROMPT="true"

# Uncomment the following line to change how often to auto-update (in days).
# export UPDATE_ZSH_DAYS=13

# Uncomment the following line if pasting URLs and other text is messed up.
# DISABLE_MAGIC_FUNCTIONS="true"

# Uncomment the following line to disable colors in ls.
# DISABLE_LS_COLORS="true"

# Uncomment the following line to disable auto-setting terminal title.
# DISABLE_AUTO_TITLE="true"

# Uncomment the following line to enable command auto-correction.
# ENABLE_CORRECTION="true"

# Uncomment the following line to display red dots whilst waiting for completion.
# Caution: this setting can cause issues with multiline prompts (zsh 5.7.1 and newer seem to work)
# See https://github.com/ohmyzsh/ohmyzsh/issues/5765
# COMPLETION_WAITING_DOTS="true"

# Uncomment the following line if you want to disable marking untracked files
# under VCS as dirty. This makes repository status check for large repositories
# much, much faster.
# DISABLE_UNTRACKED_FILES_DIRTY="true"

# Uncomment the following line if you want to change the command execution time
# stamp shown in the history command output.
# You can set one of the optional three formats:
# "mm/dd/yyyy"|"dd.mm.yyyy"|"yyyy-mm-dd"
# or set a custom format using the strftime function format specifications,
# see 'man strftime' for details.
# HIST_STAMPS="mm/dd/yyyy"

# Would you like to use another custom folder than $ZSH/custom?
# ZSH_CUSTOM=/path/to/new-custom-folder

# Which plugins would you like to load?
# Standard plugins can be found in $ZSH/plugins/
# Custom plugins may be added to $ZSH_CUSTOM/plugins/
# Example format: plugins=(rails git textmate ruby lighthouse)
# Add wisely, as too many plugins slow down shell startup.
plugins=(git)

source $ZSH/oh-my-zsh.sh
# User configuration

# export MANPATH="/usr/local/man:$MANPATH"

# You may need to manually set your language environment
# export LANG=en_US.UTF-8

# Preferred editor for local and remote sessions
# if [[ -n $SSH_CONNECTION ]]; then
#   export EDITOR='vim'
# else
#   export EDITOR='mvim'
# fi

# Compilation flags
# export ARCHFLAGS="-arch x86_64"

# Set personal aliases, overriding those provided by oh-my-zsh libs,
# plugins, and themes. Aliases can be placed here, though oh-my-zsh
# users are encouraged to define aliases within the ZSH_CUSTOM folder.
# For a full list of active aliases, run `alias`.
#
# Example aliases
# alias zshconfig="mate ~/.zshrc"
# alias ohmyzsh="mate ~/.oh-my-zsh"


source ~/.bash_profile
4、~/bash_profile 不生效
┌─[healerjean@MAC] - [~/.oh-my-zsh/themes]
└─[$] vim ~/.zshrc
加入
source ~/.bash_profile
然后执行命令
source ~/.zshrc
三、软件安装
1、安装多个版本 JDK
1)安装包 直接安装
dmp包直接安装两个版本的jdk,比如我这里安装的1.8.0_181、10.0.2。

2)环境配置
打开环境变量配置文件
bash_profile
vim ~/.bash_profile


# java
export JAVA_8_HOME="/Library/Java/JavaVirtualMachines/jdk1.8.0_181.jdk/Contents/Home"
export JAVA_10_HOME="/Library/Java/JavaVirtualMachines/jdk-10.0.2.jdk/Contents/Home"

alias jdk8="export JAVA_HOME=$JAVA_8_HOME"
alias jdk10="export JAVA_HOME=$JAVA_10_HOME"

export JAVA_HOME=$JAVA_8_HOME
export PATH="$JAVA_HOME:$PATH"


source ~/.bash_profile
3)命令任意切换版本
控制台输入
jdk8或者jdk10就会自动切换
JeandeMBP:~ healerjean$ jdk8
JeandeMBP:~ healerjean$ java -version
java version "1.8.0_181"
Java(TM) SE Runtime Environment (build 1.8.0_181-b13)
Java HotSpot(TM) 64-Bit Server VM (build 25.181-b13, mixed mode)


JeandeMBP:~ healerjean$ jdk10
JeandeMBP:~ healerjean$ java -version
java version "10.0.2" 2018-07-17
Java(TM) SE Runtime Environment 18.3 (build 10.0.2+13)
Java HotSpot(TM) 64-Bit Server VM 18.3 (build 10.0.2+13, mixed mode)
4)删除 jdk
#输入
sudo rm -fr /Library/Internet\ Plug-Ins/JavaAppletPlugin.plugin
sudo rm -fr /Library/PreferencesPanes/JavaControlPanel.prefpane


#查找当前版本 输入:ls /Library/Java/JavaVirtualMachines/
#输出:jdk1.8.0_181.jdk
sudo rm -rf /Library/Java/JavaVirtualMachines/jdk1.8.0_181.jdk
2、安装 python
-
安装:
brew install python -
版本:
python3 --version -
路径:
which python3 -
环境:
~/.bash.profile,-
alias python=python3
alias pip=pip3
-
-
pip list:列出当前 Python 环境中已安装的所有第三方包(库)及其版本号
┌─[zhangyujin1@ZBMac-J7H7T2943L] - [/opt/homebrew] - [662]
└─[$] vim ~/.bash.profile                                                                          [14:53:25]
┌─[zhangyujin1@ZBMac-J7H7T2943L] - [/opt/homebrew] - [663]
└─[$] source ~/.bash.profile                                                                       [14:54:07]
┌─[zhangyujin1@ZBMac-J7H7T2943L] - [/opt/homebrew] - [664]
└─[$] python3 --version                                                                            [14:54:14]

Python 3.13.3
┌─[zhangyujin1@ZBMac-J7H7T2943L] - [/opt/homebrew] - [665]
└─[$] pip3 list                                                                                    [14:54:27]
Package Version
------- -------
pip     25.1.1
wheel   0.45.1
四、MAC 基本命令
1、关闭端口
1)查找占用端口的进程
假设你想关闭 端口 8080,先找出哪个进程在使用它:
lsof -i :8080
输出示例:
COMMAND   PID   USER   FD   TYPE DEVICE SIZE/OFF NODE NAME
node     12345  user   20u  IPv6 0xabc...      0t0  TCP *:http-alt (LISTEN)
2)终止占用端口的进程
- 使用 kill 命令(推荐先尝试)
kill 12345
2、MAC 换行符
\r是回车 ,\n是换行
| 系统类型 | 换行符 | 说明 |
|---|---|---|
| Unix / Linux | \n |
Line Feed,一直如此 |
| Windows | \r\n |
Carriage Return + Line Feed |
| macOS(OS X 及以后,2001 年起) | \n |
和 Unix/Linux 一致 |
3、Homebrew
Homebrew 是 macOS(以及 Linux)上非常流行的 包管理器(Package Manager)
- 避免手动编译源码
- 快速搭建开发环境(Python、Ruby、Go、Docker、PostgreSQL 等一键安装)
- 方便管理多个工具版本(配合
brew install和brew switch或其他工具如pyenv)
1)安装
-
安装:
-
/bin/bash -c "$(curl -fsSL https://raw.githubusercontent.com/Homebrew/install/HEAD/install.sh)"
-
-
验证
-
┌─[zhangyujin1@ZBMac-J7H7T2943L] - [~] - [657]
└─[$] brew --version                                                                               [14:44:57]

Homebrew 4.4.16
┌─[zhangyujin1@ZBMac-J7H7T2943L] - [~] - [658]
└─[$] cd /opt/homebrew
-
2)镜像源配置
~/.bash.profile 添加
export HOMEBREW_BOTTLE_DOMAIN=https://mirrors.aliyun.com/homebrew/homebrew-bottles
| 镜像 | 地址 |
|---|---|
| 阿里云 | https://mirrors.aliyun.com/homebrew/homebrew-bottles |
| 清华大学 | https://mirrors.tuna.tsinghua.edu.cn/homebrew-bottles |
| 中科大 | https://mirrors.ustc.edu.cn/homebrew-bottles |