Nginx域名配置详细介绍
前言
Github:https://github.com/HealerJean
1、基本命令
1.1、启动
Linux  ./nginx -c conf/nginx.conf
windows start nginx
1.2、停止
./nginx -s stop
1.3、有序退出
./nginx -s quit
1.4、配置修改后,重新载入
./nginx -s reload
1.5、重启
./nginx -s reopen
1.6、检测配置文件
./nginx -t
1.7、平滑重启
kill -HUP nginx进程号
kill -HUP '/var/run/nginx.pid"

当nginx接收到HUP信号时,它会尝试先解析配置文件(如果指定文件,就使用指定的,否则使用默认的),如果成功,就应用新的配置文件(例如:重新打开日志文件或监听的套接字),之后,nginx运行新的工作进程并从容关闭旧的工作进程,通知工作进程关闭监听套接字,但是继续为当前连接的客户提供服务,所有客户端的服务完成后,旧的工作进程就关闭,如果新的配置文件应用失败,nginx继续使用之前的配置进行工作。
2、属性解释
2.1、listen 监听的端口;server_name 建议的域名或者ip
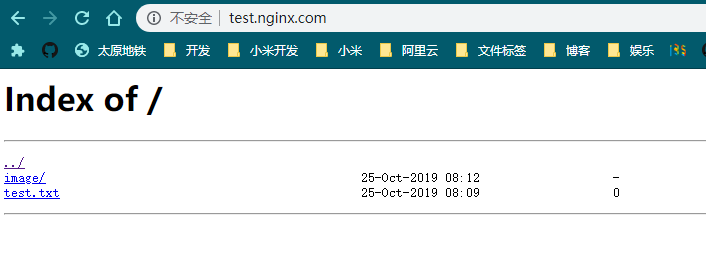
2.2、autoindex on;
- 解释 :开启浏览功能,开启网站目录文件列表功能,访问目录时列出其中的文件列表,默认不开启
 server {
        listen       80;
        server_name  test.nginx.com;
        root   D:/nginx/;
        # 开启网站目录文件列表功能,访问目录时列出其中的文件列表,默认不开启
        autoindex on;

    }
- 测试
http://test.nginx.com
2.3、index
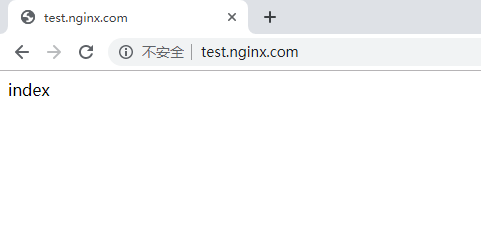
- 解释 :如果url没有匹配,则优先index文件,没有这个属性值也是默认会查找index.html文件
 server {
        listen       80;
        server_name  test.nginx.com;
        root   D:/nginx/;
        index  index.html index.htm;
        autoindex on;

    }
- 测试
我在root目录下放入一个index.html文件,并写入文件内容index
http://test.nginx.com
2.4、location匹配规则
2.4.1、匹配规则
| 模式 | 含义 |
|---|---|
| location = /uri | = 表示精确匹配,只有完全匹配上才能生效 |
| location ^~ /uri | ^~ 开头对URL路径进行前缀匹配,并且在正则之前。前缀匹配,如果有包含关系时,按最大匹配原则进行匹配。比如在前缀匹配:location /dir01 与location /dir01/dir02,如有请求 http://localhost/dir01/dir02/file 将最终匹配到 location /dir01/dir02 |
| location ~ pattern | 正则匹配:区分大小写的 |
| location ~* pattern | 正则匹配:不区分大小写的 |
| location /uri | 不带任何修饰符,也表示前缀匹配,在正则匹配之后 |
| location / |
2.4.2、匹配顺序
- 首先精确匹配
= - 其次前缀匹配
^~ - 其次是按文件中顺序的正则匹配
- 然后匹配不带任何修饰的前缀匹配。
- 最后是交给
/通用匹配 - 当有匹配成功时候,停止匹配,按当前匹配规则处理请求
2.4.3、测试
location = / {
   echo "规则A";
}
location = /login {
   echo "规则B";
}
location ^~ /static/ {
   echo "规则C";
}
location ^~ /static/files {
    echo "规则X";
}
location ~ \.(gif|jpg|png|js|css)$ {
   echo "规则D";
}
location ~* \.png$ {
   echo "规则E";
}
location /img {
    echo "规则Y";
}
location / {
   echo "规则F";
| url | 匹配规则 | |
|---|---|---|
| http://localhost/ | A | |
| http://localhost/login | B | |
| http://localhost/register | F | |
| http://localhost/static/a.html | C | |
| http://localhost/static/files/a.exe | X | 虽然 规则C 也能匹配到,但因为最大匹配原则,最终选中了 规则X |
| http://localhost/a.gif | D | |
| http://localhost/static/c.png | C | 规则C顺序优先 ,规则E不起作用 |
| http://localhost/a.PNG | E | 规则 E 不区分大小写。 |
| http://localhost/img/a.gif | D | 虽然 规则Y 也可以匹配上,但是因为正则匹配优先,而忽略了 规则Y。 |
| http://localhost/img/a.tiff | Y |
2.5、 日志记录
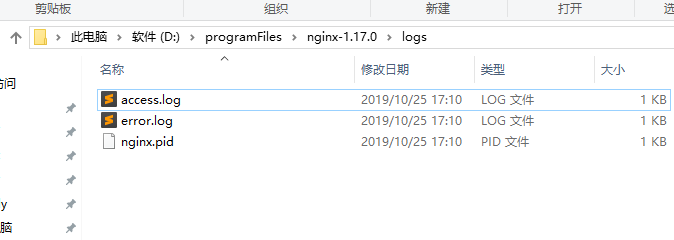
2.5.1、默认日志
虽然下面的log_format的注释没有打开,但是也是有日志查看的在logs文件夹下,下面的log_format开启是自定义日志支持
2.5.2、打开自定日志支持
 log_format  main  '$remote_addr - $remote_user [$time_local] "$request" '
                      '$status $body_bytes_sent "$http_referer" '
                      '"$http_user_agent" "$http_x_forwarded_for"';
2.5.2.1、自定义日志的目录和文件
配置自定义日志之后,我们访问当前的server就不会进入上面的日志文件中了
 server {
        listen       80;
        server_name  test.nginx.com;

        access_log  D:/nginx/log/access.log  ; //默认是main级别的,我们一般生成设置这个就可以了


        root   D:/nginx/;
        index  index.html index.htm;

    }
127.0.0.1 - - [25/Oct/2019:17:14:09 +0800] "GET / HTTP/1.1" 304 0 "-" "Mozilla/5.0 (Windows NT 10.0; Win64; x64) AppleWebKit/537.36 (KHTML, like Gecko) Chrome/77.0.3865.120 Safari/537.36"
127.0.0.1 - - [25/Oct/2019:17:14:12 +0800] "GET /1111111111111 HTTP/1.1" 404 555 "-" "Mozilla/5.0 (Windows NT 10.0; Win64; x64) AppleWebKit/537.36 (KHTML, like Gecko) Chrome/77.0.3865.120 Safari/537.36"
2.5.2.2、添加多个自定义级别
server {
        listen       80;
        server_name  test.nginx.com;

        access_log  D:/nginx/log/access.log  main;
        error_log   D:/nginx/log/error.log   warn;

        root   D:/nginx/;
        index  index.html index.htm;

    }
分别访问正常的url和错误的404url


- access.log
127.0.0.1 - - [25/Oct/2019:17:26:53 +0800] "GET / HTTP/1.1" 304 0 "-" "Mozilla/5.0 (Windows NT 10.0; Win64; x64) AppleWebKit/537.36 (KHTML, like Gecko) Chrome/77.0.3865.120 Safari/537.36" "-"
127.0.0.1 - - [25/Oct/2019:17:28:19 +0800] "GET /1111111111111 HTTP/1.1" 404 555 "-" "Mozilla/5.0 (Windows NT 10.0; Win64; x64) AppleWebKit/537.36 (KHTML, like Gecko) Chrome/77.0.3865.120 Safari/537.36" "-"
- error_log
2019/10/25 17:28:19 [error] 7856#9844: *2 CreateFile() "D:/nginx/1111111111111" failed (2: The system cannot find the file specified), client: 127.0.0.1, server: test.nginx.com, request: "GET /1111111111111 HTTP/1.1", host: "test.nginx.com"
2.6、自定义错误页面
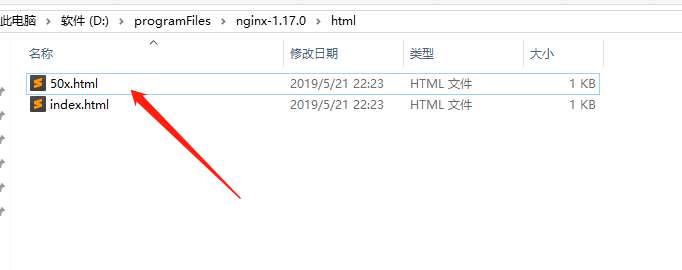
注意目录和文件名
error_page   500 502 503 504  /50x.html;
proxy_intercept_errors on;
  location = /50x.html {
   root   html;
}
server {
        listen       80;
        server_name  test.nginx.com;

        access_log  D:/nginx/log/access.log  main;
        error_log   D:/nginx/log/error.log   warn;

        root   D:/nginx/;
        index  index.html index.htm;

        error_page   500 502 503 504  /50x.html;
        proxy_intercept_errors on;
        location = /50x.html {
            root   html;
        }
    }
2.7、alias 别名(注意是目录)
location /name/ {
      alias /home/www/huan/;
}


访问http://test.nginx.com/name/a.html实际指定的是/home/www/huan/a.html。
注意:alias指定的目录后面必须要加上"/",即/home/www/huan/不能改成/home/www/huan


上面的配置也可以改成root目录配置,
location /name/ {
  root /home/www/;
}
2.8、控制站点访问
    # 控制站点访问
         location /NginxDeny {
            deny 127.0.0.1;
            allow 128.163.0.0/24;
            allow 128.163.1.1;
            deny all;

        }
2.9、nginx地址重写
-
last: 本条规则匹配完成后,继续向下匹配新的location URI规则
-
break:本条规则匹配完成后,终止匹配,不再匹配后面的规则,浏览器地址栏URL地址不变
-
redirect:返回302临时重定向,浏览器地址会显示跳转后的URL地址,返回302状态码
-
permanent:返回301永久重定向,浏览器地址栏会显示跳转后的URL地址,返回301状态码
302临时性重定向:对旧网址没有影响,但新网址不会有排名 ,301永久性重定向:新网址完全继承旧网址,旧网址的排名等完全清零
2.9.1、last和break区别和联系
-
last 和 break 当出现在location 之外时,两者的作用是一致的没有任何差异。
-
last 和 break 当出现在location 内部时,两者就存在了差异
last: 使用了last 指令,rewrite 后会跳出location 作用域,重新开始再走一次刚刚的行为,

break: 使用了break 指令,rewrite后不会跳出location 作用域。它的生命也在这个location中终结。


last: 重新将rewrite后的地址在server标签中执行,last一般写在server和if中,而break一般使用在location中

break: 将rewrite后的地址在当前location标签中执行
2.9.1.1、测试
在root文件夹下创建文件q.html,写入内容 qqqqqqqqq
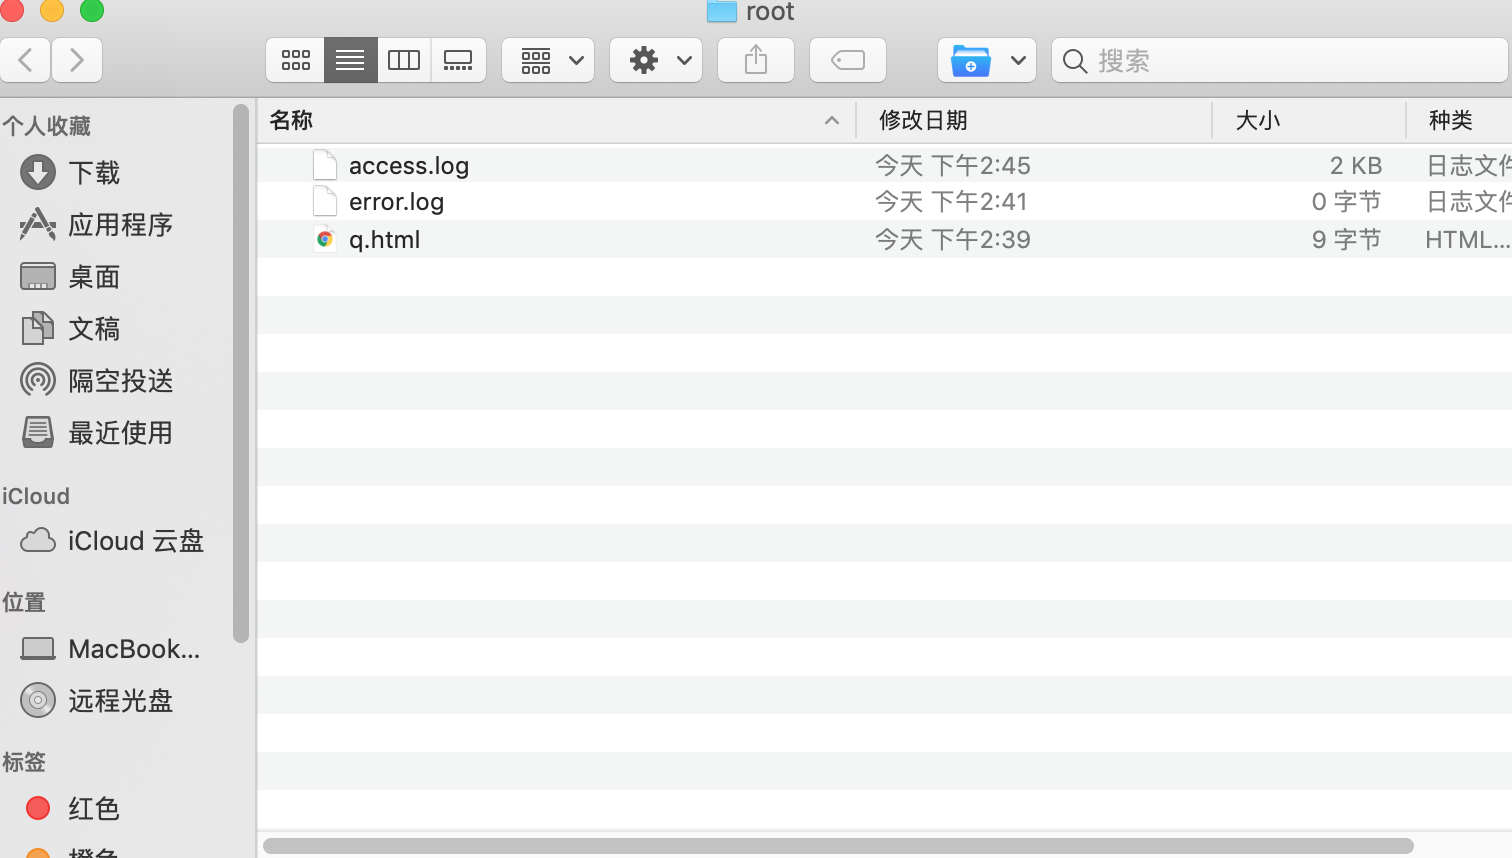
   server {
       listen       80;
       server_name  test.nginx.com;

       access_log  /Users/healerjean/Desktop/root/access.log  main;
       error_log   /Users/healerjean/Desktop/root/error.log   warn;

       root /Users/healerjean/Desktop/root/    ;


       location / {
           rewrite /last/   /q.html last;
           rewrite /break/  /q.html break;
       }

       location = /q.html {
           return 400;
       }

   }
- 浏览器访问 http://test.nginx.com/q.html

- 浏览器访问 http://test.nginx.com/last/ http://test.nginx.com/last/fasdf

- 浏览器访问 http://test.nginx.com/break/ http://test.nginx.com/break/fasdfa

2.9.1.2、总结
访问/last/时重写到/q.html,然后使用新的uri再匹配,正好匹配到locatoin = /q.html然后返回了400
访问/break时重写到/q.html,由于返回了break,则直接停止了
2.9.2、permanent 测试
  server {
            listen       80;
            server_name  test.nginx.com;

            access_log  /Users/healerjean/Desktop/root/access.log  main;
            error_log   /Users/healerjean/Desktop/root/error.log   warn;

            root /Users/healerjean/Desktop/root/    ;


            location / {
                rewrite /permanent/   /q.html permanent;
            }

        }
浏览器输入: http://test.nginx.com/permanent/,会自动调整成 http://test.nginx.com/q.html

2.9.3、其他说明
$ 匹配字符串的结尾 $1 正则变量的值,$1表示第一个()内的正则匹配内容,$2为第二个
last和break一般作用于server内部,不要使用域名重写它,这样浏览器会显示域名
server {
  listen       80 ;
  server_name     test.nginx.com ;

  proxy_set_header Host $host;
  proxy_set_header X-Real-IP $remote_addr;
  proxy_set_header REMOTE-HOST $remote_addr;
  proxy_set_header X-Forwarded-For $proxy_add_x_forwarded_for;

  return 301 http://graceway.m.duoqugame.net$request_uri;

   # 最早支持的写法
# rewrite ^(.*)$ https://$host$1 permanent;

# 这是nginx最新支持的写法
# return 301 https://$host$request_uri;

}
2.9.3.1、根据不同浏览器地址重写
  if ($http_user_agent ~* "Firefox")  {
      rewrite ^(.*)$ /NginxFirefoxRewrite/$1  break;
  }
2.9.3.2、 $host根据域名地址重写
if ($host = www.liuli.com' ) {
   rewrite ^/(.*)$ http://www.heaeljean.com/$1 permanent;
}
2.10、nginx限速
优先下载10m的内容,当下载到10m后开始,限速10k 这里面有提供下载的资源
    location /NginxDownLoad {
            limit_rate_after 10m;
            limit_rate 10k;
        }
2.11、负载均衡
设备的状态有:
1、down 表示单前的server暂时不参与负载
2、weight 权重,默认为1。 weight越大,负载的权重就越大。
3、max_fails 允许请求失败的次数默认为1。当超过最大次数时,返回proxy_next_upstream 模块定义的错误
4、fail_timeout max_fails次失败后,暂停的时间。
5、backup 备用服务器, 其它所有的非backup机器down或者忙的时候,请求backup机器。所以这台机器压力会最轻。-
upstream backend {
    server 127.0.001:8010 weight=1 max_fails=2 fail_timeout=30s;
    server 127.0.0.1:8011 weight=1 max_fails=2 fail_timeout=30s;
}

server {
        listen 80;

        proxy_set_header Host $host:8010;
        proxy_set_header X-Forwarded-For $remote_addr;
        proxy_set_header X-Real-IP  $remote_addr;


        location  / {
             proxy_pass http://backend;
        }
   }
2.11.1、轮询(weight=1)
解释:默认选项,当weight不指定时,各服务器weight相同, 每个请求按时间顺序逐一分配到不同的后端服务器,如果后端服务器down掉,能自动剔除。
upstream bakend {
server 192.168.1.10;
server 192.168.1.11;
}
2.11.2、weight 权重
解释:指定轮询几率,weight和访问比率成正比,用于后端服务器性能不均的情况。 如果后端服务器down掉,能自动剔除。 比如以下配置,则1.11服务器的访问量为1.10服务器的两倍。
upstream bakend {
server 192.168.1.10 weight=1;
server 192.168.1.11 weight=2;
}
2.11.3、ip_hash
解释:每个请求按访问ip的hash结果分配,这样每个访客固定访问一个后端服务器,可以解决session不能跨服务器的问题。
如果后端服务器down掉,要手工down掉。
upstream resinserver{
ip_hash;
server 192.168.1.10:8080;
server 192.168.1.11:8080;
}
2.11.4、 fair(第三方插件)
解释:按后端服务器的响应时间来分配请求,响应时间短的优先分配。
upstream resinserver{
server 192.168.1.10:8080;
server 192.168.1.11:8080;
fair;
}
2.11.5、url_hash(第三方插件)
解释:按访问url的hash结果来分配请求,使每个url定向到同一个后端服务器,后端服务器为缓存服务器时比较有效。
upstream resinserver{
server 192.168.1.10:8080;
server 192.168.1.11:8080;
hash $request_uri;
hash_method crc32;
}
2.12、不停网更新
upstream backend {
	server 192.168.198.128:8080 weight=1;
	server 192.168.198.128:8090 weight=4;
	server 192.168.198.128:8091 backup;
	}

server {
	listen 80;
	server_name localhost;

	location / {
	   root html;
	   index index.html index.htm;
	   proxy_pass http://backend;
	}
-
服务器1、服务器2和服务器3都正常启动,我刷新页面,会按照权重规则请求服务器1和服务器2,并不会请求服务器3(备份服务器)。
-
接下来我把服务器1停掉,服务器2和服务器3都正常启动,我刷新页面,这个时候所有请求都是服务器2,也并不会请求服务器3(备份服务器)。
-
接下来我把服务器1、服务器2都停掉,服务器3正常启动,我刷新页面,所有请求都转发到服务器3(备份服务器),看图片:
-
我再次依次启动服务器1和服务器2,所有请求都又按照权重规则分配了。在你所有正常服务器都挂掉时,系统依然高可用,这就是备份服务器的用处!
2.13、添加多个conf文件
1、在nginx安装目前下 新建 vhost 文件夹,在文件下创建 *.conf 的文件 ,如 video.haile.com.conf ,命名规则大多以域名的方法来命名文件。

2、编辑 conf 文件,把我们平常放在 nginx.conf 里的 server{...}  段复制过来直接粘贴到 conf 里。

3、在 nginx.conf 的 http{...} 段中加入   include E:/nginx-1.8.1/vhosts/*.conf;

注:这里 include 需要用到全路径,且文件后缀是用 conf
2.14、变量说明
#设置主机头和客户端真实地址,以便服务器获取客户端真实IP
#后端的Web服务器可以通过X-Forwarded-For获取用户真实IP
proxy_set_header           Host $host;
proxy_set_header           X-Real-IP $remote_addr;
#记录远程的ip
proxy_set_header           X-Forwarded-For $proxy_add_x_forwarded_for;
3、域名配置
#user  nobody;
worker_processes  1;

#error_log  logs/error.log;
#error_log  logs/error.log  notice;
#error_log  logs/error.log  info;

#pid        logs/nginx.pid;


events {
    worker_connections  1024;
}


http {
    include       mime.types;
    default_type  application/octet-stream;

    #log_format  main  '$remote_addr - $remote_user [$time_local] "$request" '
    #                  '$status $body_bytes_sent "$http_referer" '
    #                  '"$http_user_agent" "$http_x_forwarded_for"';

    #access_log  logs/access.log  main;

    sendfile        on;
    #tcp_nopush     on;

    #keepalive_timeout  0;
    keepalive_timeout  65;

    #gzip  on;

    server {
        listen       80;
        server_name  localhost;

        #charset koi8-r;

        #access_log  logs/host.access.log  main;

        location / {
            root   html;
            index  index.html index.htm;
        }

        #error_page  404              /404.html;

        # redirect server error pages to the static page /50x.html
        #
        error_page   500 502 503 504  /50x.html;
        location = /50x.html {
            root   html;
        }

        # proxy the PHP scripts to Apache listening on 127.0.0.1:80
        #
        #location ~ \.php$ {
        #    proxy_pass   http://127.0.0.1;
        #}

        # pass the PHP scripts to FastCGI server listening on 127.0.0.1:9000
        #
        #location ~ \.php$ {
        #    root           html;
        #    fastcgi_pass   127.0.0.1:9000;
        #    fastcgi_index  index.php;
        #    fastcgi_param  SCRIPT_FILENAME  /scripts$fastcgi_script_name;
        #    include        fastcgi_params;
        #}

        # deny access to .htaccess files, if Apache's document root
        # concurs with nginx's one
        #
        #location ~ /\.ht {
        #    deny  all;
        #}
    }


    # another virtual host using mix of IP-, name-, and port-based configuration
    #
    #server {
    #    listen       8000;
    #    listen       somename:8080;
    #    server_name  somename  alias  another.alias;

    #    location / {
    #        root   html;
    #        index  index.html index.htm;
    #    }
    #}


    # HTTPS server
    #
    #server {
    #    listen       443 ssl;
    #    server_name  localhost;

    #    ssl_certificate      cert.pem;
    #    ssl_certificate_key  cert.key;

    #    ssl_session_cache    shared:SSL:1m;
    #    ssl_session_timeout  5m;

    #    ssl_ciphers  HIGH:!aNULL:!MD5;
    #    ssl_prefer_server_ciphers  on;

    #    location / {
    #        root   html;
    #        index  index.html index.htm;
    #    }
    #}

}
3.1、地址重写
	server {
			listen       80 ;
			server_name     duodian.cai.dangqukeji.cn ;

			proxy_set_header Host $host;
			proxy_set_header X-Real-IP $remote_addr;
			proxy_set_header REMOTE-HOST $remote_addr;
			proxy_set_header X-Forwarded-For $proxy_add_x_forwarded_for;

			return 301 http://graceway.m.duoqugame.net$request_uri;

			 # 最早支持的写法
         # rewrite ^(.*)$ https://$host$1 permanent;

         # 这是nginx最新支持的写法
         # return 301 https://$server_name$request_uri;
         # return 301 https://$host$request_uri;

}
3.2、反向代理
   server {
        listen       80;
        server_name  xiaodang.m.duoqushop.com;

        proxy_set_header Host $host;
        proxy_set_header X-Real-IP $remote_addr;
        proxy_set_header REMOTE-HOST $remote_addr;
        proxy_set_header X-Forwarded-For $proxy_add_x_forwarded_for;


        location / {
          proxy_pass http://proxy.m.fqapps.com;
        }
		}
3.3、负载均衡
  upstream mysite {
     server 47.104.466.466:8080 ;
     server 47.104.122.122:8080 backup;
   }


    server {
        listen       80;
        server_name  server.healerjean.cn;

        proxy_set_header Host $host;
        proxy_set_header X-Real-IP $remote_addr;
        proxy_set_header REMOTE-HOST $remote_addr;
        proxy_set_header X-Forwarded-For $proxy_add_x_forwarded_for;


        location / {
         proxy_pass http://mysite;

        }
    }
2.4、部署前端代码(root.txt可以直接放到目录下面)
server {
            listen       80;
            server_name  info.healerjean.cn infomsg.healerjean.cn infoquan.healerjean.cn ;

            root        /usr/local/VueWebInfoProject/;
            index       index.html,index.htm;

            proxy_set_header Host $host;
            proxy_set_header X-Real-IP $remote_addr;
            proxy_set_header REMOTE-HOST $remote_addr;
            proxy_set_header X-Forwarded-For $proxy_add_x_forwarded_for;

            location / {
                try_files $uri /index.html;
            }
     }
2.5、验证根目录已经返回我自己的文字
server {
        listen       80;
        server_name  kequyh.m.dangquyouhui.cn ;

        proxy_set_header Host $host;
        proxy_set_header X-Real-IP $remote_addr;
        proxy_set_header REMOTE-HOST $remote_addr;
        proxy_set_header X-Forwarded-For $proxy_add_x_forwarded_for;

       location = /root.txt {
            default_type text/html;
            return 200 '32f9262143d2479080df590b3cff55f4';
        }

        location / {
          proxy_pass http://proxy.m.fqapps.com;
        }
}
2.6、同时配置前后端访问
upstream backend {
        server 10.10.10.10:8031 weight=1 max_fails=2 fail_timeout=30s;
        server 10.10.10.11:8031 weight=1 max_fails=2 fail_timeout=30s;
}

server {
        listen 9999;
	    #如果端口不会冲突 可以不写  server_name  120.131.9.128;
        access_log  /usr/local/service/log/nginx/scf_manager.log ;

        proxy_set_header Host $host:9999; # host一般只有域名,没有端口,
        proxy_set_header X-Forwarded-For $remote_addr;
        proxy_set_header X-Real-IP  $remote_addr;


        root /usr/local/service/app/scf/scf-manager-webapp/;

        location ~ ^/api/ {
            set $xlocation 'fintech'; # 配置一个变量
            proxy_pass http://backend;
        }

        location / {
            try_files $uri $uri/ /index.html;

        }


        location ~ ^/\. {
                deny all;
        }

        error_page   500 502 503 504  /50x.html;
        proxy_intercept_errors on;
        location = /50x.html {
            root   html;
        }
}
2.7、本地配置前后端项目
server {


        listen       80;
        server_name  scf-manage-web;

        #后台
        location /api {
         proxy_set_header Host  $host;
         proxy_set_header X-Real-IP $remote_addr;
         proxy_set_header X-Forwarded-For $proxy_add_x_forwarded_for;
         proxy_buffering off;

         proxy_pass http://127.0.0.1:8084/api;
         proxy_set_header Cookie $http_cookie;

        }

        # 前端
        location / {
         proxy_set_header X-Forwarded-For $proxy_add_x_forwarded_for;
         proxy_buffering off;

         proxy_pass http://127.0.0.1:8086;
         proxy_set_header Cookie $http_cookie;

        }
    }


